
JSON and the Arduino Yun
Introduction
The Arduino Yun is a fabulous little device that gives you all the ease of hardware interfacing associated with Arduino products combined with the power of a small Linux and wifi-enabled board. This tutorial gives a brief example of how I worked with this combination to provide a control application available through mobile and desktop browsers that lets you:
- Control the data direction of the digital pins
- Control the logic levels on digital output pins
- Read the logic levels on digital input pins
- Read the values of the analog input pins
Control is made via a webpage served by the Arduino which runs Javascript to make requests to the Yun. Information is passed back to the browser in JSON format. The application uses the jQuery and jQueryMobile frameworks to ease the burden of ajax calls and cross-browser compatibility. The webpage is written with a HTML5 compatible browser in mind (users of Internet Explorer 8 or earlier may need to think about installing or using a different browser) and javascript must be enabled. The image below shows the opening page as viewed on an iPad mini running iOS 7.

As it stands, this is a demonstration to show the mechanics of data transfer. For a custom application, results would be displayed in a more meaningful and exciting way on the web page (for example, if an analog input came from a temperature sensor you could draw a thermometer and mark the value). All code is given as-is with no guarantees of suitability or reliability! Please link if you find it useful.
Some limitations
This demonstration uses REST-based calls (see the Arduino blog page here). This means that any changes of state have to be sent as a request to the Yun server which then responds appropriately. These requests can be automated in Javascript, and indeed this is made available for reading digital and analog inputs. However, because of the use of a REST call there is a delay while data is sent/received. On my system that can be up to about 4 seconds. A more dynamic system should use web-sockets to keep a connection between the browser and the Yun – that’s for another day! That said, however, the demonstration here is easily capable of powering applications where you don’t need immediate control; so what if it takes a few seconds for a command to turn a light off, or if you only read the external temperature every 10 seconds?!
I have left pins D0 and D1 alone in this example as they are used for serial communication.
Yun set-up
It is assumed that the Yun has an sd card attached and that the card has a directory called “arduino” in the root of this drive and a subdirectory “www” in the “arduino” directory, i.e. the following path exists on the Yun:
/mnt/sda1/arduino/www
The application files will be uploaded to a new subdirectory of the above by the Arduino IDE. Note, for this to be the case you need to upload the application from the IDE using the wifi connection NOT a USB cable. (You can also use scp at a Linux/Mac command line to copy files over to the sd card – see this link for background material.)
For testing you might want to connect some of the input/output pins to a prototyping board so you can set inputs and display outputs using a LED.
The Yun code – 32u4 side
I will not list the full code here but you can download it from this link. Note, the text is in a Word file to be compatible with WordPress media options. Once downloaded just copy/paste into the Arduino IDE. Save the code as Remote. This will create a directory called Remote with the file Remote.ino in it.
The Yun code sets up a YunClient to receive requests of the form:
/arduino/<command>/<data>.
The /arduino part directs the request to the software running on the 32u4 side. The /arduino/ part will be stripped so that the 32u4 receives the <command>/<data>, which is converted to a String object.
There are 3 commands that can be issued:
- io – this sets the data direction of the digital pins
- do – this sets the logic levels for the digital pins set as output
- in – this requests a JSON object giving the state of the pins
All 3 commands return a JSON object. For the first two this is simply a status, while for the third is is a list of pin states (see later).
command: io
The io command is dealt with as shown below.
if (command=="io")
 {
 command=client.readStringUntil('/');
 command.trim();

for (i=0;i<command.length();i++)
 {
 pinDirs[i]=byte(command.charAt(i)-48);
 }

// set JSON header
 client.println("Status: 200");
 client.println("Content-type: application/json");
 client.println();
 // return ok status
 client.print("{\"ret\":\"ok\"}");

// update data direcitons
 setPinDirs();
 }
Lines 3-4 extract the data sent with the command. This will be a series of 12 digits that indicates the user’s desired direction of data for the digital pins D2, D3, … D12. These are stored in the command string as a series of ASCII values for ‘0’ (output), ‘1’ (input) and ‘2’ (input with internal pull-up). Line 8 converts these to byte values (0, 1 or 2) by subtracting the ASCII code for ‘0’, which is 48.
Lines 11-16 constructs a JSON response header and creates a simple JSON object to return to the browser. This has the JSON key/value data:
{
    "ret" : "ok"
}
Line 19 calls a function to set the pin data direction values.
// set the pin modes based on the pinDirs[] array
void setPinDirs()
{
 for(i=0;i<12;i++)
 {
 if (pinDirs[i]==0) pinMode(2+i, OUTPUT);
 if (pinDirs[i]==1) pinMode(2+i, INPUT);
 if (pinDirs[i]==2) pinMode(2+i, INPUT_PULLUP);
 }
}
command: do
The do command is dealt with as shown below.
if (command=="do")
 {
 command=client.readStringUntil('/');
 command.trim();

for (i=0;i<command.length();i++)
 {
 if (command.charAt(i)!='-')
 {
 pinVals[i]=byte(command.charAt(i)-48);
 }
 else
 {
 pinVals[i]=255;
 }
 }

// set JSON header
 client.println("Status: 200");
 client.println("Content-type: application/json");
 client.println();
 // return ok status
 client.print("{\"ret\":\"ok\"}");

// update data values
 setPinVals();
 }
Lines 3-4 extract the data sent with the command. This will be a series of 12 characters that indicates the user’s desired logic level for the digital pins D2, D3, … D12. These values are only valid for those digital pins designated as output. The string of characters will be ‘0’ or ‘1’ for valid output pins and ‘-‘ for input pins. As with the io command, the ASCII values are converted to byte values and again a JSON status object is returned.
Line 26 calls a function to set the outputs to the requested values. Note, as this function also reads the current state of inputs it will be described in the following section.
command: in
The do command is dealt with as shown below.
if (command=="in")
 {
 // update data values
 setPinVals();

// set JSON header
 client.println("Status: 200");
 client.println("Content-type: application/json");
 client.println();

// set JSON data
 //
 // first give the data direction definitions
 client.print("{\"Datadir\" : [");
 for (i=0;i<12;i++)
 {
 client.print("{\"datadir\" : "+String(pinDirs[i])+"}");
 if (i<11) client.print(",");
 }
 // finish the array
 // then give the digital input values
 client.print("],\"Digital\" : [");
 for (i=0;i<12;i++)
 {
 if(pinDirs[i]==0)
 {
 client.print("{\"dataval\" : "+String(pinVals[i])+"}");
 }
 else
 {
 client.print("{\"dataval\" : "+String(10+pinVals[i])+"}");
 }
 if (i<11) client.print(",");
 }
 // finish the array
 // then give the analog input values
 client.print("],\"Analog\" : [");
 for (i=0;i<6;i++)
 {
 client.print("{\"dataval\" : "+String(anVals[i])+"}");
 if (i<5) client.print(",");
 }
 client.print("]}");
 }
Line 4 calls a function to set/get output/input values.
Lines 6 – 43 construct a JSON object to return to the browser. This gives arrays for three key values indicating the data direction status of the pin (0, 1 or 2 – see io command), the digital values of the pins (0 or 1 for outputs and 10 or 11 for inputs) and the analog values for the analog inputs (as an integer from 0 to 1023). The JSON object returned is shown below:
{
 "Datadir" :
 [
 {"datadir" : 0},
 {"datadir" : 1},
 {"datadir" : 1},
 {"datadir" : 1},
 {"datadir" : 1},
 {"datadir" : 0},
 {"datadir" : 1},
 {"datadir" : 0},
 {"datadir" : 1},
 {"datadir" : 1},
 {"datadir" : 1},
 {"datadir" : 0}
 ],
 "Digital" :
 [
 {"dataval" : 0},
 {"dataval" : 11},
 {"dataval" : 10},
 {"dataval" : 11},
 {"dataval" : 10},
 {"dataval" : 1},
 {"dataval" : 11},
 {"dataval" : 1},
 {"dataval" : 11},
 {"dataval" : 10},
 {"dataval" : 11},
 {"dataval" : 0}
 ],
 "Analog":
 [
 {"dataval" : 1023},
 {"dataval" : 750},
 {"dataval" : 500},
 {"dataval" : 250},
 {"dataval" : 50},
 {"dataval" : 0}
 ]

}
The setting and getting of values is performed by the following function.
// set the output pin values based on the pinVals[] array
// read the digital input values and store in the pinVals[] array
// read the analog input values and store in the anVals[] array
void setPinVals()
{
 for(i=0;i<12;i++)
 {
 if (pinDirs[i]==0 && pinVals[i]==0) digitalWrite(2+i,LOW);
 if (pinDirs[i]==0 && pinVals[i]==1) digitalWrite(2+i,HIGH);
 if (pinDirs[i]==1 || pinDirs[i]==2)
 {
 if (digitalRead(2+i)==LOW) pinVals[i]=0;
 if (digitalRead(2+i)==HIGH) pinVals[i]=1;
 }
 }

// read analogue values.
 // The arduno uses a multiplexor for analog in with all inputs using
 // a commons ADC. This means that the multiplexor needs to switch
 // between inputs and time is required for the voltage to stabilise.
 // Multiple reads with a delay can help
 for (i=0;i<6;i++)
 {
 // first read trigger the switch
 anVals[i]=analogRead(i);
 // delay to let voltage stabilise
 delay(20);
 // Next read gives correct reading with no ghosting from other channels
 anVals[i]=analogRead(i);
 }
}
The code above shows an important hardware consideration for Arduino and other similar devices. While they may have (in this case) 6 analog inputs, each input uses the same ADC – the inputs are connected via a multiplexor. This can cause ‘ghosting’ of one input to another when several are read sequentially. To avoid this, the code makes a read on each pin twice with a delay between the two reads. The first read triggers the multiplexor to connect the pin to the ADC and make a conversion, but the reading won’t necessarily be accurate as the voltage in the ADC may not have settled from the previous value. A delay of 20 ms is introduced to allow the input voltage to stabilise before performing another read which will give a more accurate value. Note, a request from the browser will take several seconds to complete and serve, so an introduced delay of 6 x 20 ms, or about 1/8th of a second, will not be noticeable.
The Yun code – web pages
The Remote directory created by the Arduino IDE contains the Remote.ino file with the 32u4 code. The next step is to create a subdirectory called “www” into which you can copy the web and script files. All files in this www subdirectory are uploaded to the SD card when the Arduino IDE uploads the code. The file and directory structure should be as follows
Remote
    Remote.ino
    www
        index.html
        jquery-mobile
            put downloaded jQuery and jQuery mobile scripts here
        scripts
            yunscript1.js
        styl1.css
That is, the www directory should contain the files index.html and styl1.css and the directories query-mobile and scripts. The jquery-mobile directory should contain the downloaded versions of jQuery and jQuery-mobile for the relevant sites (choose the ZIP download and copy the files to this directory). Make sure you download a version of jQuery that is compatible with the version of jQuery-mobile! I used jQuery 10.1.2 and jQuery-mobile 1.4.0) The scripts directory should hold the downloaded file “yunscript1.js”, which contains all the custom javascript to make the AJAX calls. The three custom files required are linked below. Please ensure you copy them to the correct location as described above.
- index.html. This is the HTML5 page (put this in the www directory)
- styl1.css. This is a custom styling sheet for page elements (put this in the www directory)
- yunscript1.js. This is the script that drives the application (put this in the www/scripts directory)
Again, the links are given as Word documents to fit in with WordPress’s restrictions on file type. Simply copy the contents into a text editor and save in the correct location under the correct filename. Please do check the filenames match the above list – do not rely on the filenames used by the Word documents!
I will not detail the code here as it is commented in the files. Basically the HTML code sets up a jQuery-mobile AJAX site with 5 pages.
- Page1: The home page
- Page2: Displays and lets the user change the direction of digital data
- Page 3: Displays and lets the user change the logic levels for the digital outputs
- Page4: Displays the logic levels for the digital inputs
- Page5: Displays the analog input values
The javascript associated with the operation of each page is sectioned off in the yunscript1.js file so it should be reasonably easy to see what’s happening when each page is selected. As an example, the code for page 3 is shown below.
// *****************************************************************************
// PAGE 3 FUNCTIONS
// *****************************************************************************
 // when page 3 selected from the main menu call the function to read the
 // current digital ouput values and update the radio selections
 $('#callinitp3').click(function() {initpage3();});

 // function to make a call to the Yun and use the JSON data sent back to initialise the
 // radio selections for the current digital output values
 function initpage3()
 {
     $('#loadingall').html('...Loading');
     $('#loadingall').show();

//$.getJSON("V_io_test.json",function(data){ // swap this for line below to test locally
     $.getJSON("/arduino/in/",function(data){
     $('#setdigital_vals').empty(); // empty the div
         var j=2;
         $.each(data.Digital,
             function (key,value) // 0/1 digital pin is output with value 0/1 10/11 digital pin is input with value 0/1
             {
                 var labStr = "D"+j.toString();

                 if (value.dataval==0 || value.dataval==1) // output - add slider on page
                {
                    $('#setdigital_vals').append('<div id="radiogroup'+j+'" data-role="fieldcontain"><fieldset data-role="controlgroup" data-type="horizontal" data-mini="false"><legend>'+labStr+'</legend><input type="radio" name="radio-val-d'+j+'" id="radio-val-d'+j+'1" value="val-'+j+'1" checked="checked"/><label for="radio-val-d'+j+'1">High</label><input type="radio" name="radio-val-d'+j+'" id="radio-val-d'+j+'2" value="val-'+j+'2"/><label for="radio-val-d'+j+'2">Low</label></fieldset></div>' );

                    $('#setdigital_vals').trigger('create');

                    if (value.dataval==1) {$('#radio-val-d'+j+'1').prop("checked",true).checkboxradio( "refresh" );}else{$('#radio-val-d'+j+'1').prop("checked",false).checkboxradio( "refresh" );}
                    if (value.dataval==0) {$('#radio-val-d'+j+'2').prop("checked",true).checkboxradio( "refresh" );}else{$('#radio-val-d'+j+'2').prop("checked",false).checkboxradio( "refresh" );}

                }

                j++;
             });

            $('#loadingall').hide();

        }); // getJSON
        $('#setdigital_vals').trigger('create'); // trigger a create on parent div to make sure the label and buttons are rendered correctly

 // going through radio objects here won't work as the getJASON is async and items won't be defined.

 }

// Send new data values to Yun
 //
 // string sent to arduino is
 // /arduino/do/010101010101/
 //
 // 0: set pin LOW if output
 // 1: set pin HIGH if output

 $('#change_io').click(function() {

     var urlStr="/arduino"+doSaveStateOut();

     $('#loadingall').html('...Saving');
     $('#loadingall').show();

 //$.getJSON("stat.json",function(data){ // swap this for line below to test locally
     $.getJSON(urlStr,function(data){
 //alert(data.ret);
     $('#loadingall').hide();
     });
 });

// construct the save-state string to send
 function doSaveStateOut(){

     var RVal="/do/";

     for (var j=2;j<=13;j++)
     {
         if ($('#radio-val-d'+j+'1').length>0)
         {
             RVal+=getRadioStateDVal('#radio-val-d'+j);
         }
         else
         {
             RVal+="-";
         }
     }
     RVal+="/";

     return RVal;
 }
 // this returns a value of 0 or 1 depending on the selection in the given radio group
 function getRadioStateDVal(RGSelection)
 {
     var k=0;
     k=1*Number($(RGSelection+'2').prop("checked"));
     k+=2*Number($(RGSelection+'1').prop("checked"));
     return (k-1).toString();
 }
Line 6. Attaches a call to the function initpage3 when the user selects the page 3 list element.
Lines 10 – 45. Makes a JSON get request of the form /arduino/in/ to trigger the “in” command on the 32u4. The returned JSON object is passed in the data object (line 16) which is then used to loop over all the elements in the array associated with the “Digital” key. Individual pin values are given by the dataval object (lines 20-36.
Lines 55-67. Attaches a call to the save button on the digital output values page and creates a JSON get URL of the form /arduino/do/<data> to send to the 32u4. This sets the logic levels of the digital outputs.
Lines 70-88. Constructs the /do/<data> string for the above JSON get.
Lines 90-96. Checks the radio selection for the given output and returns a 0 or 1 depending on the user’s request.
Similar functions to the above are found for the other pages. The code could undoubtedly be tightened and streamlined but I refrained from doing this (to the point where I repeat code blocks, for example) as I’m trying to make the scripts as transparent as possible.
Getting started
Once you’ve got the files uploaded you need to call up the Yun webpage on your browser (ensure your computer/tablet/phone is on the same wifi network). If you’ve kept the default file names the address is
http://arduino.local/sd/Remote
You should be greeted with the opening page (and a “Loading” box as the browser requests data).
There are 4 options for use, which correspond to pages 2 – 5 in the HTML and Javascript.
Digital pin in/out settings page
This page allow you to set the options for the digital pins. There are three options:
- Output
- Input
- Input with internal pull-up enabled
When the page opens there will be a short delay while the Javascript requests and loads data about the current state from the Yun. Any changes made while loading will be discarded.
Once you’ve made your selections you must click the “Save” button to send the updated configuration to the Yun.

Digital digital pin output page
This page allow you to set the logic levels of the digital pins that are designated as output. There is a short delay while the current states are retrieved from the Yun. Changes will not be sent to the Yun until you click the “Update” button. This is done to prevent stacking up a queue of server requests every time a state is changed (a web-socket approach would help make this more dynamic).

Only those pins designated as output are displayed. Changing D13 is the easiest to see as this turns the onboard red LED on and off. In the above I have also set D2 as output. You can easily check this by connecting an LED & resistor between D2 and ground (see below in the example where I have set several pins to output for testing).

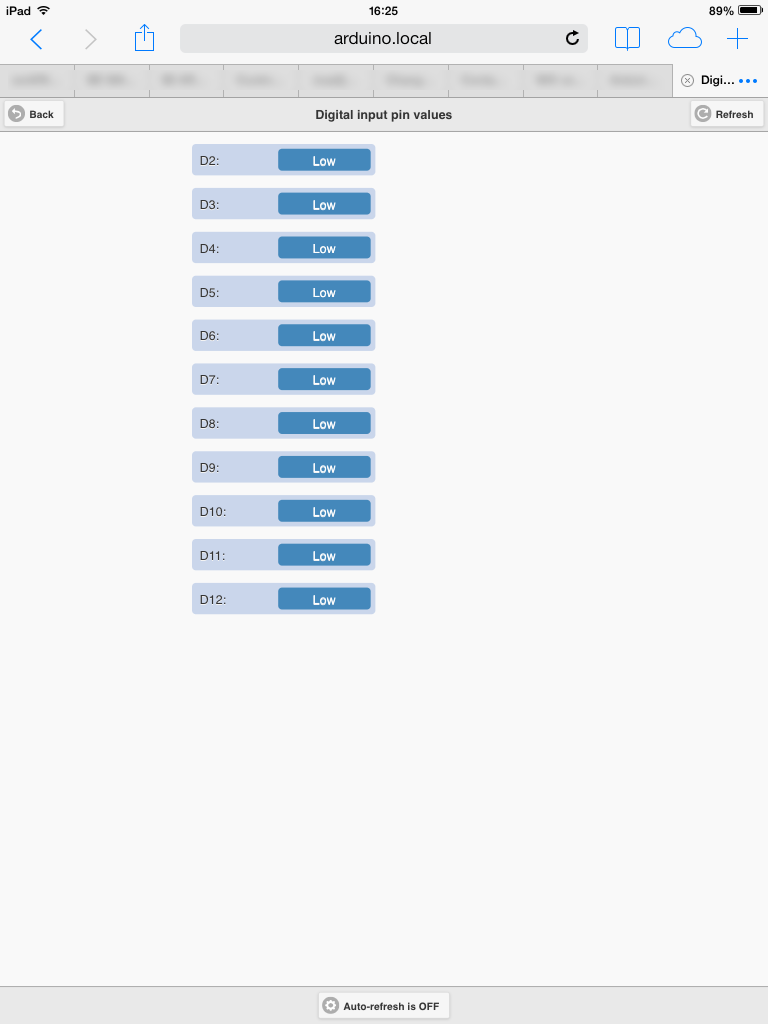
Read digital pin input values page
This page allow you to read the logic values on the digital pins set as input. There is a short delay while the current states are retrieved from the Yun. The page can be refreshed manually by clicking on the “Refresh” button. Additionally, you can turn “Auto-refresh” on to request that the script update the values at set intervals. In the script this is set at every 8 seconds to give time for the request to be handled and data sent back to the browser.
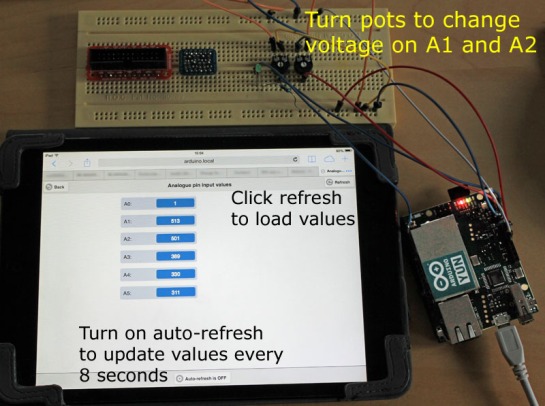
Read analogue pin input values page
This page allow you to read the voltage values on the analog pins. There is a short delay while the current states are retrieved from the Yun. The page can be refreshed manually by clicking on the “Refresh” button. Additionally, you can turn “Auto-refresh” on to request that the script update the values at set intervals. In the script this is set at every 8 seconds to give time for the request to be handled and data sent back to the browser.

You can test these inputs by connecting a potentiometer output to the pins. In the example below, two are used and connected to A1 and A2. A0 is connected to ground and the other three are floating. This set-up allows you to check that input “ghosting” does not occur. Also note, the value on A0 is 1 not 0, even though this pin is connect to ground – expect a small amount of noise in your readings!
 Coda
Coda

Hope people out there find this post useful. Please link if you do! (And remember offers of project work always considered!)

Hello,
first of all, thanks for this tutorial, I have been looking for some think like this and following your instructions I have improve a lot.
Now, I need to ask you about how to solve a problem. My web shows all the things but not in different pages, all are continuous at the same page, some thing are misconfiguration. Maybe is a problem withs css?
I can not show you but all the pages are on the first one, all together.
thanks in advance.
andreu
Thanks for the kind words!
Have you downloaded all the Query and JQuery mobile js and css files and put them in the jquery-mobile directory for transfer to the Yun? There are quite a few css files associated with JQuery mobile – I put them all in just to be sure!
I am having the same problem is all of the images or link showing up on the front page, I have been trying for a few weeks now I must be slow! any help please? you can see the site at http://tryonelectronics.com/sd/Yun_All_Inputs/
Hi Donald,
The symptoms sound like there’s a file or two missing, or not where they’re expected, or have unexpected names. Please check you’ve got the directory structure right, got all the JQuery files (including js and css) and that the correct versions are being referred to in the HTML.
Had problems seeing your site – download stalled!
Yea I downloaded all the files and I think I placed them in all of their proper folders? Is there a site with the project files already in their proper folders?
http://www.tryonelectronics.com/sd/Yun_All_Inputs/ I had to reset the arduino…
if your having problems with this then open the index file and change the version numbers of jquery and jquery mobile to the versions you have in the www folder.
Great tip – thanks Marco.
A pox on those updates! Really useful tutorial- was looking for one not using cloud services to get data from the YUN, thanks Grallator. Hope you don’t mind me fooling with the code a bit? Might be especially important to see the state of the output bits…
Pingback: Mettiamo internet nelle cose - Pratosmart
Thanks for the link back!
What should the file extension be for the jQuery file (not mobile-jQuery)?
Think it should be .js – should match the name in the html file. Let me know if you want to collaborate on a product!
I tried .js but I’m having same problem as andreu. Also tried .css, .min.js and .min.css. I’m using jquery 2.1.4 and jquery mobile 1.4.5, I don’t know what’s compatible with what. I’ve also changed the jquery version numbers in index.html
Hard to tell what’s going on remotely! The original used jquery-1.10.2.min.js in the www folder beneath the main folder which contains the index.html file (this is the jQuery file name and path referenced in the original .html file). Try putting all the files onto a PC/Mac and open with Firefox and check the web console output (under tools->web developer) for errors. If you get one like ‘ReferenceError: $ is not defined’ then the html file is not finding the jQuery file – check your paths and names.
There may be a compatibility issue between the jQuery and jQuery mobile versions you are using. Perhaps try different versions. The original used jQuery 1.10.2 and jQuery mobile 1.4.0.